Although stunningly beautiful, venturing into the mountains after a snow storm can be extremely dangerous. Avalanches, getting lost, hypothermia, and frostbite all pose a real threat. Here in Southern California, multiple hikers go missing every year at Mt Baldy, a peak in the outskirts of LA County, and a place that’s rather mild when compared to other US (and certainly world-wide) mountains.
Therefore, it’s absolutely crucial that you be prepared with the following 7 items when hiking in the snow. Regarding the links in this post, they are Amazon affiliated. However, I personally own and use all of the products (minus the satellite communicator), which is why I feel confident recommending them.
In addition to the hiking gear for snow, here’s a quick checklist that you should go over before hopping on the trail, regardless of seasons.
- Printed or purchased map of the area
- Weather forecast checked the day of the hike
- Notified family or friends of your whereabouts and roughly what time they can expect you back
- Snow chains for your vehicle, as well as
- Year-round essentials: water, water filter, headlamp, first aid kit, snacks, fire starter/lighter, knife (comes with built-in fire starter), compass, whistle, and bear spray if applicable.
Lastly, never hike alone in the backcountry, especially in dangerous conditions, such as after a snow storm.
If you can’t find someone to accompany you, at the very least invest in a satellite communicator to be able to notify SAR teams should you get lost or injured. It’s pricy, but not worth more than your life.
Let’s get started.
1. Trekking Poles
Although not absolutely necessary, trekking poles can significantly help, especially on steep snow hikes. Remember, hiking in the snow is more tiring than on dry ground, and slippery.
Trekking poles help transfer some of the stress from your legs to your arms, as well as provide balance and support.
I use a very inexpensive yet reliable pair called TrailBuddy Trekking poles which I’ve owned for at least two years now. I really love the fact that they come with multiple adapters for different terrains. You can check those out on Amazon by clicking here.
2. Microspikes
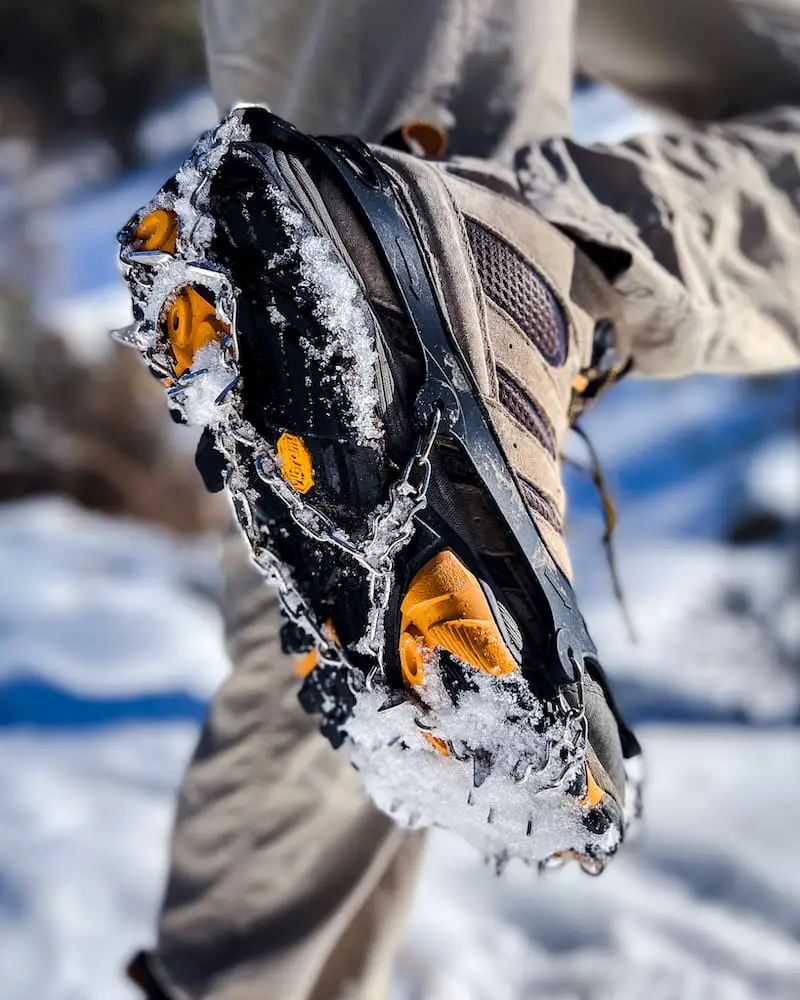
Microspikes and crampons are not to be confused, although the terms are constantly used interchangeably. Microspikes are essentially a stainless steel chain with spikes that can be wrapped around almost any shoe intended to provide more traction in icy conditions.
You could technically use them with running shoes and be good to go (minus the wet shoes).
Crampons have much larger spikes and are usually used for steep ice climbing and mountaineering, such as the Baldy Bowl in the winter. They provide much more traction than microspikes but can be overkill for hiking.
Microspikes are a NON-NEGOTIABLE while hiking in the snow. Even if you don’t use them, it’s better to have them on you, as they’re not very heavy.
A lesson I learned the hard way at the Big Horn Mine while trying to cross a section of the trail which had been completely covered with ice, slanted at an angle, and was adjacent to a 300 foot drop.
Without microspikes, hiking boots do not provide sufficient traction in icy conditions. Trust me, invest in a pair. I use these microspikes right here. The prouct page says Crampons in the title but they’re actually microspikes.
3. Polarized Sunglasses
A few years ago, a friend of a friend decided to go snowboarding without goggles or sunglasses, resulting in snow blindness, also known as photokeratitis. This painful eye condition occurs when UV light damages the retina. Think about it like a sunburn in your eyes.
Fortunately, the condition is temporary and easily prevented. An inexpensive pair of sunglasses found at your local liquor store can protect you from the UV light. Just make sure they’re polarized. You can view sunglasses on Amazon here.
4. Windbreaker
Hiking in the snow is cold, but hiking in the snow with windy conditions can be life threatening; if you don’t have a windbreaker that is.
I don’t recommend bulky jackets for snow hikes, as you’re likely to overheat. Instead, I suggest investing in a really good light or midweight windbreaker and layering up.
Do not make the mistake of NOT layering up. Unless you’re not human, you will undoubtedly get hot while ascending the trails, and removing layers will help to you to control body heat.
Since rain jackets and windbreakers are very similar, I can use my Columbia Pouration jacket as a windbreaker. It’s lightweight, warmer than a windbreaker, breathes very well, provides protection should it begin to rain, and saves me money because it can be used for both wind and rain.
My go-to snow hike attire includes a long sleeve thermal underneath a flannel and my Columbia jacket over both. You can find my rain jacket on Amazon by clicking right here.
Mind you, the attire I suggest is for snow hikes, and is not suitable for extreme conditions such as full blown blizzards, high winds, and freezing temperatures. If you expect extreme conditions, you may need a parka and special pants.
5. Beanie, Ski Mask, Or Neck Gaiter
I once made the mistake of hiking the Pine Knot Trail at Big Bear in the late fall on a non-windy day without taking protection for my head and face. Although it was only forty degrees at 9:00 am, the cold made my ears sting for a couple of hours. Increasing my body temperature by ascending the trail didn’t help.
Additionally, I went snowboarding in Wrightwood during a snow storm without a neck gaiter to protect my face and was blown away at how badly and quickly (only a few seconds) the wind stung my face and hands. I have many stories about lessons which I’ve had to learn the hard way, don’t judge me.
Anyways, I had no choice but to buy my first gaiter that day.
If you’re hiking in the snow, do yourself a favor and either take a ski mask or a beanie combined with a neck gaiter. If the wind picks up mid-hike, you’ll be ready.
Check out different types of headwear by clicking here.
5. Gloves
It goes without saying, but just like your face, your hands also require protection. Don’t believe me? Read my personally story in the previous subheading if you haven’t already.
Click here to browse Amazon’s selection of hiking gloves.
6. Socks
You could probably get away with regular hiking socks, but snow socks will make your hike a lot more comfortable. In my opinion, Darn Tough are the best socks in the world. They’re super comfortable, extremely durable, made of merino wool (for moisture wicking), and provide protection via added padding.
I own a pair of their mid-weight socks (the weight describes the thickness), which I use in temperatures from 20 degrees to upper 80s. If you only want to buy one pair, I suggest going with mid-weight.
If you plan on buying multiple pairs, then you’re better off buying a pair of heavyweight for the snow and a lightweight for the hotter months.
You can view Darn Tough midweight socks here.
7. Pants
I’ve used my hiking pants in all conditions, but eventually I’ll buy a pair specifically for the snow. You can browse through them here. Do not wear thermals underneath your hiking pants. If you do you will regret it, as it they get extremely hot on the trail.
If you’re interested in a complete list of my gear, and not just for the snow, check out the following link. I share all my gear and electronics as well.